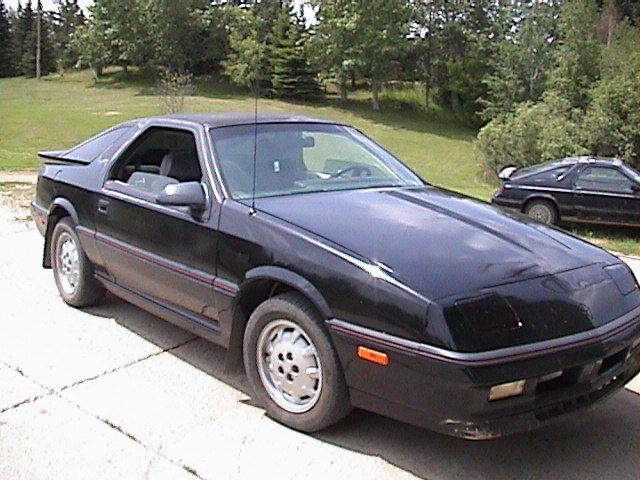
I put these pages together to share my experiences and stories of my Chrysler 2.2 Turbo II Daytona Shelby Z with others. Ever since I 'discovered' my Daytona I have had immense help from the Daytona sites, forums, and people/friends I have discovered/met on the web.
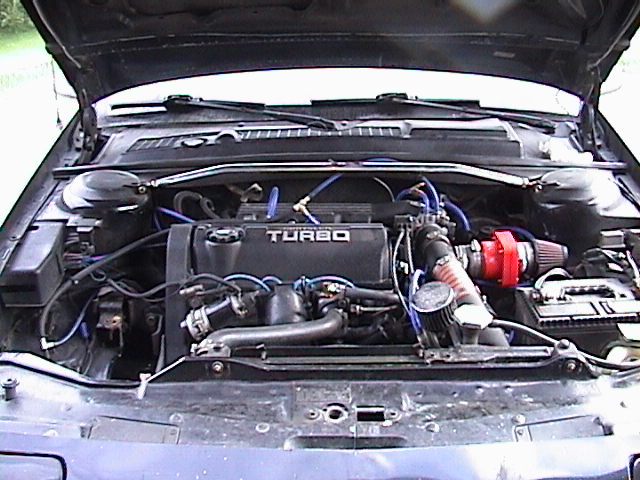
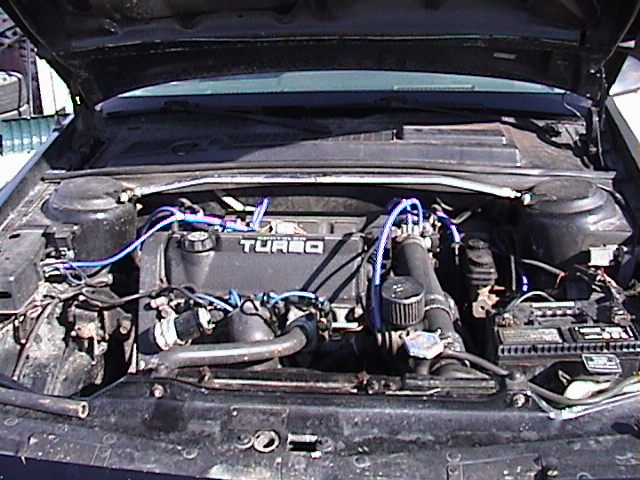
Pics of past Engine layouts
Engine V2
Engine V1.1I now have goals for the car 300-350whp AND 40+mpg!!
Updated Feburary 3, 2008
It seems I have been a bit lacking in keeping the site up to date. The car has been running very well. With the head I did, edged, Singh's style grooves I did myself and ST valves, I have been able to run 87 octane. In fact, I ran it all year. I have been very pleased with the results. I did notice once or twice when I seemed to get a bad batch of gas. It would not ping, but knock retard would show up way more. Normally, with this setup, I would get no knock retard. If I try very hard, I might be able to get a bit of knock retard. This is with 10 degrees of timing, and about 12 psi of boost.
I had another head done up by Mike Holler. This one I bought from a local friend, DJ. Then I had it checked out and gone over by my local head guy. I then sent it Mike to be ported, edged, and his intake mod. Automotivebreath did 3 Singh grooves for me. Took a bit long than planned but that is the way it always seems to go. I cryoed everything when I got it back. At this point I am waiting on my head guy to have the time to get the valves done for it. Really excited about this head go on. The old head, the grooves led to no cracks nor were they filled in by deposits, like some of the naysayers suggested would happen. The ST valves looked perfectly fine as well. Again none of the steps where filled in.
I also have been working towards putting in a 523 3.50 tranny. Another planned upgrade timing shot to hell. I had hoped to get it in the car in July/August. I have an AL Flywheel, waiting to be installed with the new tranny. The tranny is a 1990 523 3.50 with OBX and the 3.77 gear set. At the moment I am just waiting to send everything to the cryo shop. The complete tranny is being cryo treated.
Updated December 17, 2006
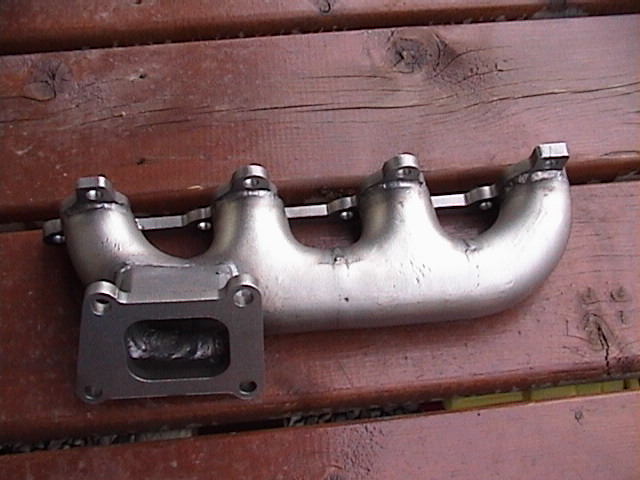
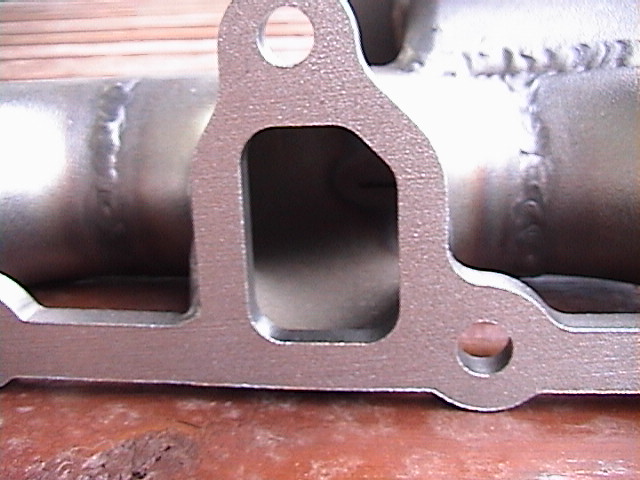
Well, the third week of October I took the head off to put on DJ's log header, the S70 turbo, and the have the ST valves installed. No matter the planning I do it still took until the second week in December to put back together. Though to be fair I did put it off 2 weeks after getting the head because I was sick. I had DJ's log header cryoed and then heat coated by MPGMike. When that came back from Mike, DJ and I worked on fitting the header with my intake. A little bit of grinding of the intake and header was necessary to fit it. DJ also helped by making a fancy wastegate bracket for the GN compressor housing. We also did some 'edging' of the head before I dropped it for the valves. Well, after a few days at the machine shop a friend from gym suggested I got a call. I was told that it is cracked and he suggests not using unless it is fixed. I could not find anyone local, willing to weld it up and was not willing to wait for it to go to Quebec to be fixed, so we went with the spare head. I spent some time attempting to 'edge' the head. I also did the Singh grooves myself with Alex's help. Overall I was somewhat happy with what I did and how the head turned out.
At the time of putting it all back together, I was doubting going with the different turbo and header because of the amount of work involved. Which really was not much. I had to get some longer fittings for one turbo coolant hose, make the wastegate bracket, and needed a longer turbo oil drain back tube. Certain assembly steps now have to be done a certain way or a certain order, but you remember those after doing things a couple of times the way that does not work.
Overall I am very happy with the changes. The exhaust sounds different, perhaps deeper. The car runs very well. I have had 0 knock retard so far. Even trying on the highway with 5th gear romps into low boost, which was usually good for a little CE flashing. Very disappointed about my EGT gauge not working. With the larger header the exhaust has been pushed a little and it now rattles on the rear spring.. I hope to try 87 octane and see what happens. In the past running 87 has always caused knock retard. Other people running the ST valves have been able to run lower grades of fuel succesfully as well as tune for ~20% less fuel.
Updated July 27, 2006
On the 25th I picked up the lifters and washers from the cryo shop. That is all I was waiting for to do the positive seal valve seals. So, last night I spent maybe 3 hours doing the seals, lifters, and a small anti-freeze leak. I picked up Milton leak down tester so I could pressurzie the cylinders. I put the car in gear and had to block both sides of a tire to keep the car from moving. I took the followers off, then I pressurized the cylinder. All the old-new valve seals seemed to be the same as far as how hard/easy they were to take off. There really was not much effort. I picked up a huge washer, about the size of a Loonie. I put this over the stem on the new seal and used that to press down. I also was able to put a deep socket and extension over it to help press down. I belive I got the seals roughly on the same, based on the gap in the metal bands.
So far the new valve seals have solved my blue cloud at start up. Very happy camper with that. I have to comment on how quiet the PT lifters are compared to the stock ones I was running. I ran them so long in the other head I forgot the difference. I was suprised on how quiet they were compare to the others when I started it up this time.
Updated July 19, 2006
Well, a few changes since last time.
I finally received the rebuilt built up head from Mike. After I disassembly it, I sent that and the complete top end to be cryoed at the local cryo shop here in Edmonton. Everything was done. Right down to the new exhaust studs, nuts, ARP head studs, intake manifold, exhaust manifold, rebuild turbo and it parts. Everything. There is enough info out that as to why to cryo. One of the main reasons for me to do this stuff was the ability to shed heat. Although it is subjective as I did not measure the temps before and after, the car does appear to cool off quickly.
I had the conical springs tested after the cryo to set aside some fears I had been reading about. They tested out at 90lbs closed and 220/224 open. If I can read the writing the height was 1.645 with a coil bind of 1.040. A 30 thou spacer will give a close pressure of 105 I have been told, with a ton of room before coil bind. I used the spacer.
I then started replacing the head June 25th. Typical, I expect a half a day of work and spend two weeks on it. I had most of the top end apart but had a few bolts I let soak. Then I waited for help to lift it off. Sean (Leafy) was kind enough to come over and help me do that. Reassembled the new head and swapped all the parts over to it. I had to adjust the #4 coolant mod as it was preventing the coolant hose for the turbo to go on and did not give access to the #4 spark plug. I just turned it to make the room I needed. Finally put on the new thermostat housing. My best friend came over and helped me lift it on. Unfortunately, the EGT probe hit the starter. I was more than a little upset about that. The next day I picked up a plug to plug the old hole and a tap to re tap the exhaust manifold where I wanted. It is on the side of #4 about one plus inch from the head. I ground down the plug so it would not stick into the manifold and effect flow. If you tap for your EGT here you run the risk of hitting the starter. Even if you do not hit the starter, I strongly suspect you will not have fun changing out the starter. That evening Darcy came over again and spend 30 seconds lifting the head on to the block. Nice and smooth this time. I have to say I enjoyed using the ARP head studs much more than MP bolts. Here is the EGT gauge installed.
Starting the car I had the intermediate shaft off, forgot to double check it. Then I had the cam timing retarded about 12 degrees. It started and ran, but a double check showed I adjusted in the wrong direction. With the head CCed at 46, to give 8.6 C/R, .0105thou = 1cc I figured about .063 was shaved using the info that 1 degree per .010 shaved. That with the little the block was deck I figure the cam timing was retarded from the milling about 6-7degrees. So, I have adjust the cam gear advanced that much. I still want to double check this by degreeing it in as the numbers are a guideline. Doing all the cam timing took way too many tries and time. Part of the problem is with that much milled the timing belt tension er pulley is just at its limit. I can adjust all the way through its range with just my fingers. However, I can do the 90 degree test ok. Past that, takes way more effort.
I tracked down a new NS1 larger tension er pulley. Part # is P4286646 and the diameter of the MP pulley is 3.26", compared to a stocker at 2.84". If you need one you may be able to cross over the part number to an after market one. I also tracked down the 88 2.2 square tooth timing belt specs. Stock belt is 124 teeth, 46.5 long, 32/33 wide, .375 pitch angle. Gates T032 is one tooth shorter at 123 teeth, 46.125 long but only 3/4 wide. Not sure if the width difference is bad or not. Dana, Part # 95124, it is 46.15 long and 3/4 wide as well.
While I was doing the cam timing I noticed I was leaking antifreeze. Took a while but I traced it to the #4 coolant mod. It is through the frost plug, which I think is not a bad idea, however, in this case it leaked. I attempted to reseal it about 4 times before I gave up. I then went and picked up a new frost plug, 90 degree 1/4 to 1/2 hose barb fitting and nuts. Since Grove Hydraulics is beside Grove Welding and Machine I had them drill and tap the frost plug for the fitting. I then put on one of the nuts on the fitting, put some water pump RTV stuff on the nut and screwed it into the frost plug. I put the other nut on the other side and tightened it up. At this point I was upset enough I did not want anymore leaks. Lets just say that where the old one I was afraid would fall into the head, this one I was hoping I would not have to take the head off to put it on. Using my O2 socket I managed to put it in. NO LEAKS!!!
I am getting blue at start up and can smell burned oil when behind the car, though I can not see it. I suspect I did not do the valve seals corretly when I put them on. I have since found some positive seal valve seals that will be going on the car once the PT lifters are back from the cryo shop. My Chrysler dealer parts fellow told me OEM positve valve seals are made by Felpro, which I found for 25$ instead 55$ from the dealer. The Felpro ones are metal with the Rubber stuff inside it and a metal coil spring around the top. The other I found is Victor- Reiz, which has two metal bands around it. The application is 1997 3/4 ton Dodge V10 Chysler Part Number: P53009887.
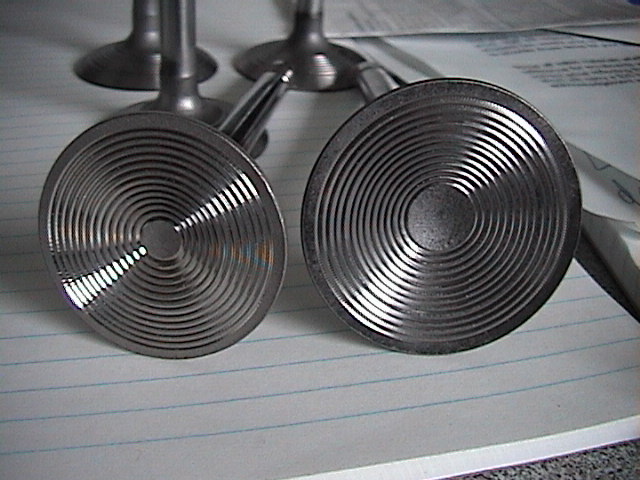
With this head having the Singh's Grooves, I have noticed my EGTs are lower than what most report. I have seen a low of 625F at idle with most of the time idle at 700F. Around town I see a low of 775F to 850F. Highway I see 875F to 950F up big hills. Boosting, is a little iffy. The temp drops so quick that by time I see the gauge I see the needle is dropping. The most I have seen is just over 1000F at 12psi being on it for what seemed like a while. These EGTs appear to be about 200F cooler than most that I have read about. I hope to tune the car some more to get the best power and mileage. Another friend, Alex, did the the grooves as well, has fairly similiar EGTs. He had his EGT installed before so he actually has before temps and on average saw an ~200F drop in temps.
When grooving our 782 heads the deck is 0.335" thick, courteous of mpgmike. Mike has mentioned that Somender has commented on how the grooves my head has, may be too wide and shallow. Some more grooving advice from another engine builder that started doing the grooves in Jan/Feb of 2005 with Somender's guidance, now with over 20 grooved engines.
"If you cut the groove too narrow [< 0.060”] wide it becomes crevice space, too small to support combustion, this groove will carbon up. If you cut the groove too wide [> 0.125”] the squish velocity in the groove goes down allowing more carbon build up."
"If deck thickness allows I cut the initial groove 0.060” to 0.080” deep. When the deck is thin ( < 0.250”) I cut the initial groove to 0.040” deep. The bottom of the groove is then contoured into the combustion chamber cavity, getting deeper as it approaches the chamber." automotivebreath
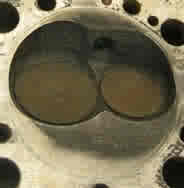
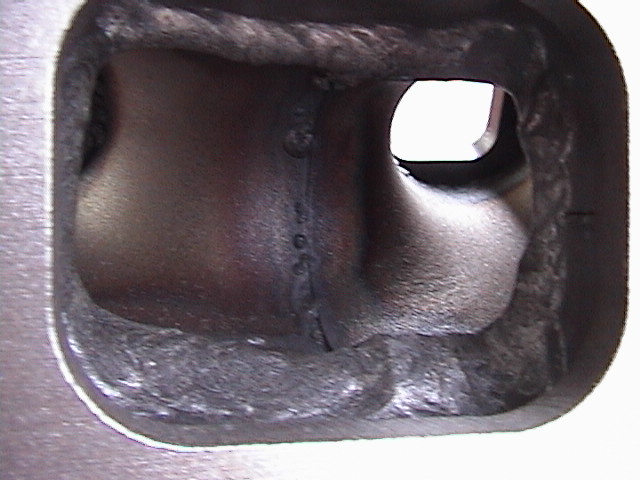
http://www.inliners.org/cgi-bin/ultimatebb...t=000705#000001AutomotiveBreath was kind enough to share a few pics of his grooved heads. Here is a pic of a grooved head after a year of running. Same type of head, no groove. Notice the combustion pattern in how it is different in the grooved head.
More pics of the head in the Gallery.
Updated May 8, 2006
Not a lot of changes happening so I have not been updating to much. But now I have done a new baseline dyno and have flow #s for the head I am getting.
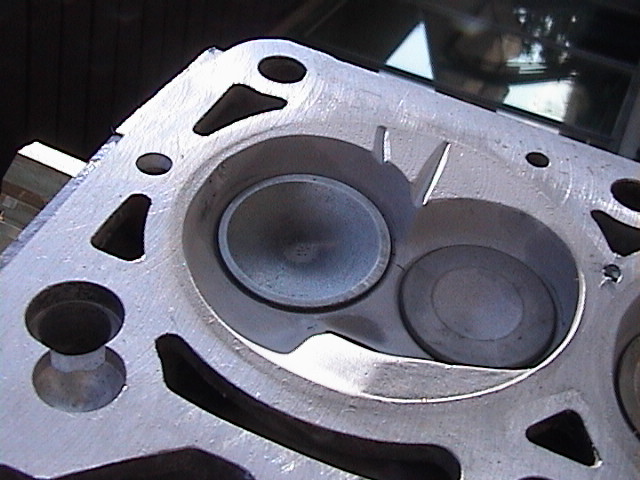
For comparison purposes, included are flow numbers from a stock head, a MP +1mm valve head, and my head done by MPGMike. Stock flow #s as posted on Turbododge.com by a fellow in BC. Stock #s are at 28" H2O and corr factor of 1.03. The ported #s are at 28" H2O and not sure what corr factor was. My head has both intake and exhaust valves at stock diameter. Valve springs are Chrysler 3.3/3.8 V-6 conical springs with Chevy Gen III SB retainers. Guides were replaced with bronze inserts. Unfortunately, the machine shop used was not able to do a radius seat on such a small hole, so both intake and exhaust seats got the 3 angle cut. Other modifications to the head include a thermal barrier heat coating for the combustion chambers, exhaust valves and runners, plus Singh's Grooves, Mike's power lines, and an intake valve modification. The compression ratio has been increased as well by milling the head. The head CCed at 46. Stock is 52. That should give a C/R of 8.6:1. More info on the grooves and the valve mod. Information on the grooves from N/A guys shows some have been able to increase their C/R 10-20%. I went for about 6%.
Here is a graph of the flow test and a picture of the head on the bench.
Intake CFM Lift Stock MP +1mm Ported (mpgmike) .100 47 53 77 .200 84 98 126 .300 109 130 156 .400 130 148 171 .500 144 164 173
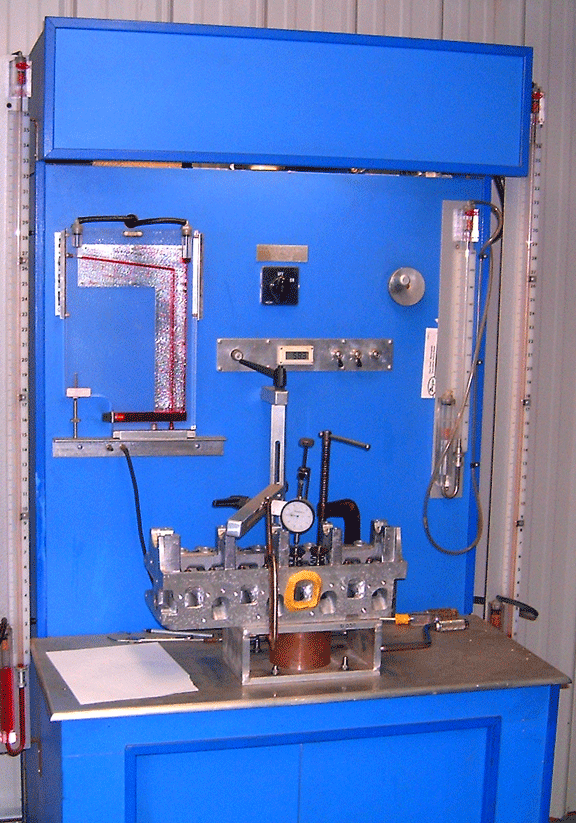
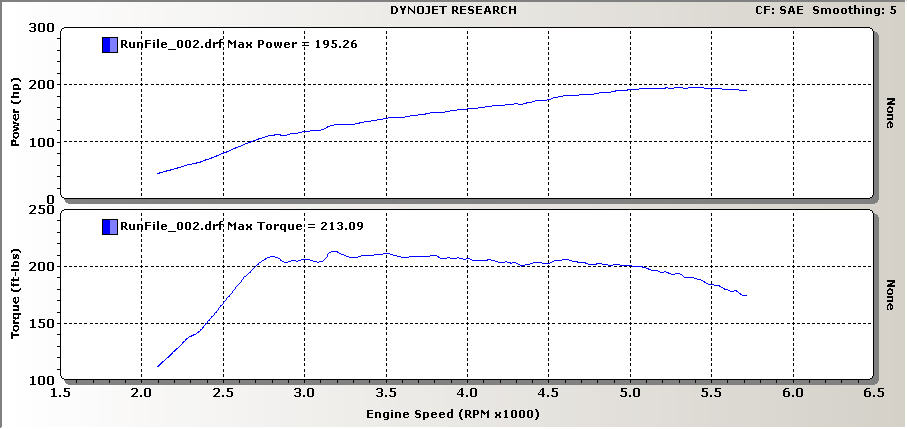
Exhaust CFM Lift Stock MP +1mm Ported (mpgmike) .100 47 50 64 .200 82 88 96 .300 102 113 120 .400 118 127 136 .500 120 137 149 In preparation for the new head I did a new baseline dyno for the car. We had a half day dyno (pages 7 & 8) at Apex Modified in Edmonton. At 10-11psi it dynoed at 195whp and 212Ft/lbs for torque. Check out April 21, 2005 for the last dyno run.
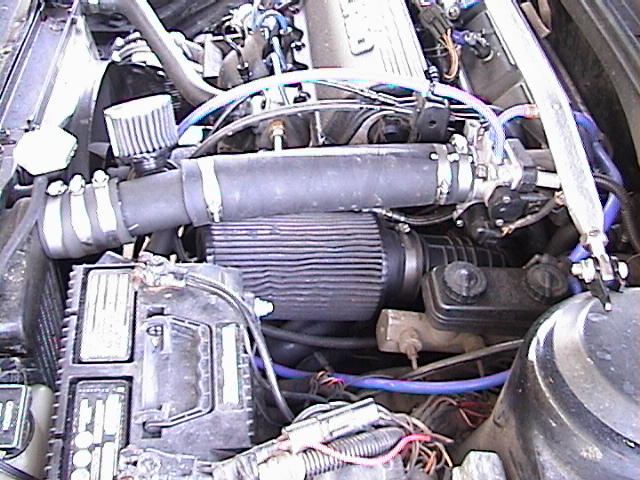
I have also worked on installing the EGT gauge, but no pictures yet. I picked up a turbo to rebuild and put the GN compressor and wheel on. It was free. Well, I paid for the .63 Stage I exhaust housing that came with it. Mike was kind enough to heat coat it for me. He also powder coated an intake mani and heat coated an exhaust mani, also tapping for the EGT probe. Here is the intake runners and TB opening. Another pic of the exhaust mani.
Updated November 22, 2005
Well, the squeaking from the KYB strut bearing plate and upper spring isolator continued. I thought perhaps a couple of weeks it would go away. It did not. I took it out AGAIN, though now I could do it in about 10 minutes. A much closer look at the parts showed the KYB strut bearing mount was made off center. Which was pushing it into the side of the upper spring isolator. No amount of grinding was going to fix it. I called where I bought the parts, Dash Distributing in Edmonton, and told them the story. They said bring them in and they will exchange them. Since they did not have KYB in stock I ended up with Gabriel. MUCH happier with those parts. The upper spring isolator came with a lower one as well. The mount came with all new hardware, new nuts, and washers. Installed the new parts and no more squeaking!!!
After that I started on the FMIC install. I had some steel welded to the car to hold the new IC earlier. I had just been waiting for a new rad to IC bracket as mine was stuck on and in case I wanted go back to stock I did not want mess with it. I used SCEET air craft hose for the plumbing. It is very flexible. Could be a little tougher. Though in all honesty it was rubbing against a very sharp jagged piece of steel and rubbed through. I bought some more GoodYear rad hose from a local farming place. I used that in places where there is sharp metal that could damage the SCEET hose. I noticed a good difference with the new IC, seemed to be more power. I expected that the boost would of been a little higher with a less restrictive IC, but that did not happen. Perhaps the runs are too long. The upper IC hose is now very cold to the touch after a drive.
With the new IC in a few other projects could proceed. One thing I did was take the hot air after the turbo and put it through my water vapor system. Well, that and gas line anti freeze saw my water usage jump up to 600mls to 200kms of driving. It use to be 100mls of water to 540kms. I noticed the increase in power with that happening. With our recent heat wave here, I did not add any gas line anti freeze this time around and the water usuage went back down and the power was slight less. Still need to test this out though.
Another project I finished up was adding a 'd-valve', TD.com coined word. Darcy and I (mostly Darcy) welded up a T to go into my upper IC hose that the d-valve would be installed on. Took some looking but I found a 2" plumbing check valve swing valve to use. Found a K&N filter that had a 2" openning and was still small enough to fit where I wanted. It has only been on the car for a couple of days so far. I want to take it off, go for a drive, then put it back on and drive again, to get a better feel for what it effected. So far, it seem to go into boost very quickly, as it is suppose to. Though I always thought the car went into boost fast. Going from a start is easier and mileage seems to be up a bit. Probably due to the hotter air pulled in under cruise. The check valve is closed when in boost.
With another friend's help I managed to do a cal for my car. Very simple changes. No fuel tables touched. I just did better fan control, CE Mod (Check engine light will flash with knock retard), and upped the voltage a little. I am very happy with it. The engine temp is cooler now. It was getting pretty high on warm days with the new FMIC in front of the rad, but not anymore.
Not sure what the next mod will be at this point. I am talking to a friend about getting a done up head. I also have a new log exhaust manifold to install as well. I want to get that flowed and looked at for improvements before I put that on though. I am hoping to do one mod at a time to dyno the what the changes do.
Updated October 12, 2005
The handling has improved tons with the new parts! I am happy with them. One thing that did bother me was a squeak coming from the front. After putting the car in the air again, I was able to see that it was coming from the upper spring isolator and the bearing plate. I took everything out took a look put a little white lithium grease in a few spots and put it back in. Still squeaked. I gave it another week to see if it would go away. Well, I was tired of it again today so I took them out again. I saw little rubber pieces in the isolator telling me something was wearing. A good look at the bearing plate and I saw some rubber 'runs'. I cut those off and no more squeaking. The other side was a little more work. The bearing plate metal cone piece that goes inside the isolator looked a little bit wider than the other one. So I ground it down a little and that fixed it.
Now I am waiting for a the rad to IC bracket (thanks Ray!!) so I can put in the new IC. Next project may be braided brake lines and new rear calipers. My back calipers rattle and drive me batty. The old calipers are worn and do not hold the pads well. I also need to put the new exhaust manifold on too and dyno the change in whp. Still need to get the head studs to do that, then I should have all the parts necessary to do that job.
Updated October 2, 2005
The old Daytona has not been handling well for a while. I think I can pretty much narrow it down to when. I was crossing a local road and caught a little bit of air? When the came down it bounced very hard many times. Since then the car has been like a pogo stick! I was not going to do the struts with out doing the springs at the same time. So when a group buy came up I thought it was time to fix the pogo. I picked up a set of custom MIRacing springs. They have a progressive spring rate which is 300 for the front and 320 for the back. After looking around locally for Konis and having one of my friends buy the last set in the province, I decided to call Cindy at FWD Performance. As always she was quick to ship and helpful. In an attempt to reduce custom charges I had them shipped to a Canadian td.com friend with an US address. It did not work out well for me to go that route.
Canadian Tire had a good sale on some CH air tools so I picked up an air ratchet and impact. Those made quick work of the strut/spring install. Since I was replacing the strut bearing mount and spring isolator I took the strut, spring and mount out as one unit. It was easy and quick. Putting it back in was simple as well. The old struts were shot! The driver strut drops like a stone, the passenger one sinks as well, but a little slower. Definitely time to replace them long ago.
I roughed in the new IC install. I had some brackets welded to the car to help support it. I tried to install it, but the hose I had were not good. They developed holes and would not seal, so I ended up putting the stocker back in. I then ordered some SCEET hose. Unfortunately, I ordered the wrong size. I asked for 2 1/4 though I was think 2 1/2 at the time. I realized I did this a day or two after, but it was already shipped out. So at the moment I am waiting for the 2 1/2 hose to come in. I am somewhat excited about this mod. I am curious how much my boost level will change with just this modification. I am hoping it will increase a few PSI. Of course it will only do this if the new IC is more efficient than the stock unit.
Updated July 22, 2005
Well, I finally got the car back on the road Tuesday, July 19. The passenger side control arm came out no problem. The driver side I could not budge. I mushroomed the bolt with my 4lb hammer I was pounding so hard. Heat did not help, other than I was able to turn it then. I took this as an excuse to dump the stub / pivot style for dual pivot. I found an 89 Shelby in a local yard and pulled its k-frame (cross member) and control arms in about 15 minutes. Really easy when there is no engine in the way. I put new Mopar control arm bushings in and new ball joints. A friend helped me do that. Thanks Rob. By the way, his 89 Daytona does 12.06 @ 113MPH in the 1/4.
I POR-15 the sway bar, control arms, and k-frame. Busted off one of the nuts inside the k-frame that the sway bar bracket goes to. Got that welded back up. At this point I noticed it looked like the steering rack was leaking. So I put a new one in as well with new tie rod ends. I had it all on the bench and bolted together. Then I put it on the jack and put it up. It was sooo easy. Doing the sway bar went better once I remember the brackets need to face a certain way. I would put the steering hoses on before the frame is all the way up. I tried it with the frame up and it was just not worth the pain. So I lowered it back down and did them. Adjusting the bobble strut was not much fun. The next day I tested the steering wheel. It just went around and around and around. A quick look and I saw the u-joint from the rack (that I swapped as the new one does not come with it) and the steering column had missed. I guess that is why it went up so easy. I dropped the column and had it installed pretty quickly and easily. Had the alignment done the next day.
Now the plan is drive the car for a while, then dyno it again. The other dyno I did is no longer around. I want to do a before and after dyno with just changing the exhaust manifold.
Updated July 3, 2005
Driving to work June 30 I broke the passenger side control arm. From the looks of the crack it was broken for a while. The last bit of metal gave a way, most likely when I did a U turn. I took it out and when I undid the sway bar I noticed the driver side was partially cracked through as well. It looks like the sway bar was rubbing on the control arms, most likely causing the failure. Perhaps the bar may have been installed upside down. I know the bushing were very tight. I could jump on the end of bar and it would not move. I had to totally undo the middle brackets to be able to move the bar.
Picked up a Grand National 86 turbo that I am going to use the compressor and wheel from. Also managed to get an EGT gauge, and a stainless steel exhaust manifold. I was going to do a head gasket change because I thought it was leaking anti-freeze from the front of the block/head. A closer look I was able to see staining from the thermostat housing. That looks to be the cause. I still need to pull the head to add the new exhaust manifold with the EGT installed. I will be doing just the manifold and will be doing a before and after dyno runs.
Updated May 6, 2005
Just to mention it again. I am very happy with the crankcase evacuation system!! No oil out of my turbo anymore. There was ever since I have had the car. If I did everything over again, it would be one of the first mods I would do.
Nothing much to say about the lifter upgrade. They seem quieter, that is about all I have noticed. That is subjective so take it as you will... Some people suggest 2 hardened washers when doing the upgrade. I am still not sure why they need to be hardened considering the head is soft aluminum. I found I needed 3 washers, with one being thinner than the other two, to make up the 4mm difference. My washers went right to the bottom of the lifter hole, and were not hung up on the taper at the bottom.
Finally think I have my knock retard figured out!! With the help of Warren Hill, Ken Adler, Derek Beland and many others. I drive in boost at part throttle. To me the car felt much stronger driving at part throttle than WOT so I never mashed the pedal. The g-valve allows higher boost levels than when a SMEC controlled boost car would see at part throttle TPS voltages. The lower TPS voltages means a different fuel table is used so less fuel is given for the given boost level than if I was driving at WOT. Data logging during the dyno showed knock at lower boost levels when at part throttle and WOT runs at higher boost levels showed no knock. I did more data logging after and that showed WOT runs with no knock while some times when doing part throttle boosting there was some. If you want to check it for yourself, with D-Cal, compare the part throttle fuel table with the WOT fuel table.
With this figured out I now stay out of boost unless my foot is planted. I also upped my ignition timing back to 12 degrees. What a difference!!! The car goes so much better now. The increase in response and power is very noticeable between the 8 degrees and the 12 degrees. I have a custom cal coming from a friend with more fuel for the part throttle table while in boost and a little less spark advance.
I have added my cheap water vapor system to the car too. It still needs to be tweaked some. Other systems have helped with emissions, mileage, power and knock retard. Too early yet to see if this system will do anything for me. Though the navigator is reporting higher mileage numbers than I normally see.
I replaced the clutch cable a couple of times before I found one seemed to be good. My old one must of stretched too much. Also looking at moving the cruise control servo to the strut tower like the newer 90+ cars.
Also added a Shelby oil cap to the car.
Updated April 21, 2005
I finally picked up the last two new Yoko Avid v4s yesterday. I now have 4 summer tires on my pumper rims. A friend of mine, Alex, was having some blue smoke issues with his built up Omni. He bought half of the crankcase evac kit from me but had not yet installed it. I told him about my oil leaks seeming to have stopped with my kit installed. That convinced him to install his too. Today he mentioned his cloud of smoke almost all gone!! Sounds like a possible worth while mod.
Today I finally put in the new lifters!! I used 3 washers. Two of one size and one skinny one. The stock lifters are 49mm the 2.4L lifers are 45mm. With the 3 washer I used the height was the same at 49mm. I am sure it has quieted down things a noticeable amount. So far very happy with doing it.
Tuesday I took the car to the dyno at PE Tuning in Edmonton run by James. You can check out my modification page to see what has been done to the car. I was running 8 degrees of ignition timing to try to reduce some knock retard. I paid 40$ and had 6 runs with a WB. Excellent deal!!! Alex ran my video so I may post a vid when I get it uploaded. I had a best run at14PSI with overboost cut out. I am trying to get more of the info from James so I can post more graphs etc.
- @ 10 psi at 2750 rpm creeping to ~12psi at 4800rpm - 188WHP and 192Ft/Lbs
- @ 10 psi at 2850 rpm creeping to ~12psi at 4900rpm - 190WHP and 192Ft/Lbs
- @ 12+ psi at 2850 rpm creeping to ~13.8psi at 4500rpm - 198WHP and 196Ft/Lbs (overboostcutout )
- @ 10 psi at 2900 rpm creeping to ~12+psi at 5250rpm - 180WHP and 170Ft/Lbs (not sure what changed)
- @ 5 psi at 2750 rpm creeping to 8psi at 4750rpm - 135WHP and 140Ft/Lbs
- @ 7 psi at 2750 rpm creeping to ~8psi at 4000rpm - 140WHP and 150Ft/Lbs
Thank you to Alex, Oksana, Dorby and his wife for coming and to Alex for "Up the boost some more!!"
Updated April 17, 2005
Well, lots of changes and new info uncovered. A friend of mine, Rob, installed the crankcase evacuation kit April 3. Other than the subjective, it seems to have a little more pep. It also seems to have seal the oil seals better. Less oil leaks. I checked the turbo today and there was NO oil leaking out of the compressor housing like there use to be. The BOV is dry too. It use to spray oil.
I put the stock injectors back in at 58 psi to see what would happen with the knock. Nothing changed. I noticed a GN AFPR was able to get lower fuel pressure on my fuel system. It was able to adjust down to 30 psi where as the modified stocker I have was only able to go down to 36 psi.
I hooked both throttle body nipples up to the boost gauge, at different times. The small nipple, drive side one, show vacuum and boost levels like the rest of the intake vacuum sources. The large one, passenger side one, shows no vacuum at idle only when you step on the throttle. It does show boost but seemed to be less that actual. The turbo compressor housing nipple only showed boost.
I am also playing with a water vapor injection system. It is very low cost, so far cost is nothing. But it just uses the vacuum from the TB nipples to pull in the water vapor. There is another hose that causes bubbles in the water to create more vapor. Under boost, when I need it most, it does not pull the water vapor.
Should be picking up two new Yoko tires for the car this week hopefully. DJ says the lifters should be in this week too.
Updated March 31, 2005
Today I added an extra crank case breather (in the shadow of the rad hose) tube from the old fuel pump blocker plate. This is in preparation for the crank case evac kit install.
Updated March 13, 2005
Last Sunday (March 6) my son and I were on the way to West Edmonton Mall to go walk around. On the way there I got stuck in 5th gear. My 4 year old was not a happy camper. Of course I left my jacket and phone at home!
After a kind lady stopped and we called my wife, I used our AMA and had the Daytona towed home.
Taking the end cover off, it was apparent what was wrong. Every time I tapped the cover with the mallet to break it loose of the silicone, I could hear a tinkle. The tinkle was the snap ring that is suppose to hold on the retainer plate and syncro assembly.
One of the syncro springs was busted up in a couple of pieces and jammed in the end cover and between the input gear and the moly plate. A friend (Rob - 12.2 in the 1/4 Daytona) came over that has rebuilt trannys and helped me out. He noticed the brass was scored and the fork ends were marked up. Both snap rings appeared to be loose. I grabbed the syncro assembly from a 89 520 and we used that. The forks were not the same nor were the gear ratio, but we were able to use everything else that we needed. Compressed the snap rings in a vise and put them back on. They are nice and tight now!
Test drove the car last night and all seems ok. No grinding into gears. Before the problem, I was grinding into 5th a lot, or just had problems putting it into gear and taking it out. I will drain out the 5w30 in a few days of driving and put in some fresh oil. I also had my tranny drain plug modified so it now has a rare earth magnetic embedded in it.
Cleaned up the vacuum lines some more. Removed my vacuum distributor block. The AFPR now gets its vacuum directly from the intake manifold all by its self. A Y vacuum connector is used for the map/baro and the boost gauge. This change over has made my boost gauge much more accurate. Now, it matches what the data logger tells me so close I can not see any difference. Vacuum reads 20 at warm idle now.
Updated February 23, 2005
Time for another update. I finally picked up an inverter from Canadian Tire to run the laptop. I have been datalogging every time I drive the car. This in an effort to help figure out a knock problem I have been having. I ran 110MON octane leaded gas for 25L from Superior Sleds in Edmonton.. (55$ CDN - Yikes!! ) At the same time I had an error 51 which it the O2 sensor so I swapped that out with a newish NTK one. With that I was able run to cut out (oops). I still could record some knock, but it was usually just at the start of a run (engine cold or warm) with the odd small bit of retard during a run, once in a blue moon.
Add the adjustable cam gear a month ago. I got it down so I could adjust from start to finish in about 5 minutes. Having it adjusted to far in either direction can sure effect the amount of knock!! Just 2 cam degrees out and I was recording knock almost ALL the time. Did not matter if I was in boost or not. I think I have it dialed in where I get the least amount of knock.
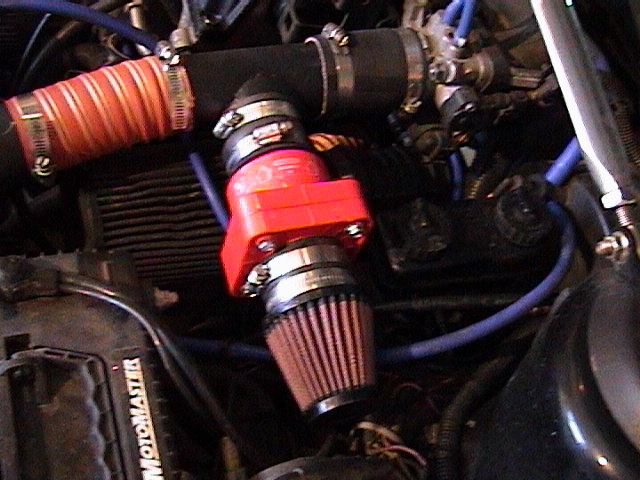
Picked up two heated seat covers from Canadian Tire for 11$ each. Took one a part and pulled the guts out to put into the driver seat. Just need to find a nice button for the install. Finally picked up an alarm and keyless entry. Going to a friend's place to install that. That same friend leant me his cone filter to try out. Thanks DJ!!
With a few people on the boards saying they did not notice anything, backed up with one or two dyno plots, I was not excited about putting one in. I thought it was very nice of DJ to let me try it to see if like it. I love it!! Hearing the turbo spool up so much easier is worth it alone. I did notice some driveablity improvements with it. From a stop there is less bogging and a quicker/smoother get up and go, so it seems.
I also finally put in an 89 shorter shifter that another friend was kind enough to give me Thanks Chris!. Worked on getting rid of most of the squeaks and rattles. Seems to be working so far. Double sided sticky tape helps.
I picked up a crankcase evacuation kit for a V8. It goes from the valve cover PCV tube to the downpipe. A check valve will be welded in and a silicone heater hose connect the two. I will also put on an extra breather connected to the fuel pump block off plate on my pre-common block. When the new lifters come in I think I will do the valve seals at the same time. They are so cheap to do, may as well.
Updated December 14, 2004
Well, I have done a bit since the last update. I have put a new coil in and mounted it where the AC/Alternator bracket would go. I used rubber backed washers to help absorb some of the vibration. Some people have mentioned problems with the coil mounted on the engine, so I am hoping the rubber washers will help.
Had the car up on stands for 6? weeks. I POR-15ed the driver wheel well, patched some holes, and did the bottom of the car on the drivers side. Also did the rear wheel wells while I was at it. The silver POR does not go as far as the black but does appear to be much tougher. I sprayed the wheel wells with truck bed liner to help as well. From the looks of the car I did not notice rust, but boy under that seam sealer there was some. Look behind the strut tower that is a bad spot. Also one of the clips for the brake lines goes into the car. It does not seal well and is a bad spot for rust. My e-brake hole was not rusty, that was good.
Put in new seats from a car that had tinted windows from day one from the looks of the colour. My grey seats where pretty whitish, these are definitely grey. Also cleaned out the throttle body really well. Put on a new valve cover. A once piece gasket one. You can tell by how deep the groove is. It is sooo much nicer than the old one when if you ever need to pop it off and on. . I had it powder coated which I am disappointed with. It already has chips in it.
I picked up some new lifters. They are for the 2.4L, and have a hole at the top. Should be better for less air trapped in the lifter, maybe quieter. For now I have just replaced two lifters that were a bit soft. Picked up the spring compressor tool for 20USD makes changing the lifters sooo easy. A friend needed some new lifters so I gave him mine. They are shorter and had to be shimmed up some. He seems happy with them.
Updated August 25, 2004
The POR-15 looks good. It has come off in a couple of spots. I blame my prep work in those spots for that.
My rear brakes have rattled ever since I put the 11" brakes on. The caliper bracket where the pads sit have such bad grooves worn in it from the pads. My best friend welded up the grooves for me. I ground them into shape. No more rattle!! After doing the driver side, which was the worst, I had no brakes for a while. Think I may need a new caliper. I am sure the piston was pushed in and took a very long time to go back out. The passenger side did not have a problem.
Have Yoko Avid v4 225/50 R16 for my summer 16" pumper rims coming in soon, now that summer is almost over. Looking at KYB Gas-a-Adjust for the back shocks. Ordered some MP 2.4 lifters with the big hole up top. Should get those this week.
Updated July 11, 2004
While I was deciding what to do with the equal length axle and intermediate shaft that would not come a part, I decided to prep and POR-15 the bottom passenger side since the axle was out. Did the caliper, rotor, and knuckle in the silver instead of the black I was doing the bottom in. The silver looks very sharp. Also seems to dry faster and harder than the black in the same amount of time. A friend, Randy Hicks, suggested going unequal length. He also had a spare one that he gave me for nothing. So I finally decided to go unequal length for the passenger axle and skip the intermediate shaft all together. Randy and another local TDer friend mentioned that they had not noticed anymore torque steer than with the equal length system. Guess I will be finding out shortly myself..
Updated July 4, 2004
I have added the Data Logging page.
I replaced my fuel pressure regulator on June 23. No more recorded knock at 8 psi of boost. None at 10psi either. 13-14 there was some. I upped the pressure but it did not seem to make a difference. I dumped the boost back down to 12psi. June 29 I installed my 40+ injectors that I have had since last summer. Started the fuel pressure high and worked my way down. It is currently ~38psi. I also upped the timing from the 10 degrees I had it at to prevent the knock. At 14 degrees there was knock, so I dumped it down to 12. Seems to be ok. Need to test it more. Replacing the passenger CV axle today. What fun. Noticed the one from my car is 1/4" bigger than the rebuilt one I bought.
Updated June 21, 2004
So many ideas for the site so little time it seems. I updated the modifications page. Think about doing the gallery. I want to add a section on data logging. I have written some software that I use with my OTC 4000e scanner that can continuously datalog to a laptop. I had big ideas for the software, but since I was just using it I never bothered.
Picked up 5 16" pumpers that are in good shape, for the car. Hope to put those on. I did find 2 excellent shape crabs that I put on the car already. Right now I am trying to figure out a knock problem that my scanner shows. I tightened up bolts, have 7 knock sensors on my bench to test. I put in a new high flow high pressure fuel pump and filter. I can smell faint gas in the vacuum line for the fuel pressure regulator. I will be putting on my AFPR soon. I just want to polish it up with some POR-15 polish.
Working more on appearance than going fast, lately. At least, until I figure out the knock I have recorded. New carpet in the hatch, fixing some rust, new wheels, tires planned, doing the tint, thinking about paint and putting on the 89 GFX I have.
I put my stock SMEC back in. The custom vendor calibration I picked up second hand appears to not show the Charge Air temp sensor temperatures. Tried a new sensor and the put chip in a different SMEC, same result. Since I am data logging, having the CAS readings is nice, hence the switch back.
The links page has been updated.
Updated October 4, 2003
Finally, September 26, 2003 I have the pistons on order. I am getting custom 20 over forged wiseco pistons. Instead of the head saving shim, I had the pistons made to take into consideration the amounts milled from the head and block. The shop that did the work had told me the first rebuild that the total amount shaved was 20 thou. When I was talking to him again about it, he said it was only 10 from the head and 3 from the block.
It always seems to take so long to get this stuff organized. I asked a shop to get me prices and the pistons. I waited on them for 2 weeks until I asked the shop doing the machining to get the pistons. After another week I told them I could find them quicker and did so. Now I wait for 3-4 weeks until they get here. Of course everything else was ready 2 weeks ago.
I have been thinking of getting a scanner or software for my laptop that will read the sensors from the car.
I was lucky, the machine shop said nothing was damaged. They cleaned everything up replaced the springs on the head, polished the crank, and ball honed the cylinders.
Took the time to change the door panels to ones from an 89 ES that had power windows so I do not have the hole for the window crank anymore. Also found a console lid that was in near mint condition that I put on the car.
August 28, 2003 I ran into a problem with car. Check out this for the story.